One way of quickly altering/ resizing a vintage pattern, without accurate grading, is to slash and spread. This vintage size 18 pattern is the equivalent of today's size 14 dimensions (UK).

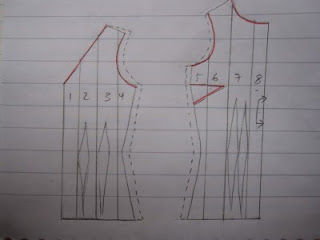
For a modern size 10 woman, this pattern would need to be graded down 2 sizes. There is approximately 9/10cm (3.5/4 inches) difference to remove from the pattern. Rather than taking this from just the side seams, which simply doesn't work, you can use the 'slash and spread' method. Mark three, even, vertical lines on the front and back patterns, trying to avoid the darts, and cut or 'slash' into four pieces (I would trace the pattern and work on this, rather than the original). Mark the pattern pieces 1-8, so you don't get them muddled up (see image below). Then divide the excess, which needs to be removed from the pattern, by the number of vertical edges and side seams (15, as the front is cut on the fold)= 6mm. This may seem confusing, but if you were to 'spread' the pieces below out, you would create 2 edges per slash.

6mm is the amount you need to remove from each vertical edge and each side seam. I would mark a line 6mm from each vertical edge and then pin the pattern pieces back together using these new lines. Ensure you remove 6mm from each side seam too. You will need to smooth off the shoulder, neck and armhole lines, as below.
*Check the bust and waist measurements are larger than your own (there should be approx 3" extra on the bust and 1" on the hips, although this top is supposed to be close fitting). Measure the bust line on the front and back, add them together and double (a pattern is equivalent to half your body). Repeat for the waist line. If they are smaller than your measurements, email me!
*I recommend making a toile/ muslin of the pattern first to ensure it fits. This way you can adapt the pattern further by fitting it to your unique shape.
This method can be used for enlarging patterns too. You would slash and spread in the same way as above, but you would need to stick the pieces onto a sheet of paper in order to 'spread' the pattern and thus enlarge.

 The mid-section needed yo be cut on the bias to create better folds, so I cut this on the stand.
 This shows how I have raised the midsection:
 The original design has folds on the shoulder, so I have added extra fabric here to create this effect.


